Even if you aren’t an experienced photographer or editing pro, you can still create a visually appealing Instagram feed. Regardless of whether you’re using Snapseed, VSCO, Plann’s in-built editing tools or simply applying Insta filters, there’s so many ways to create a beautiful grid.
In this post, our friends from Fix The Photo share Instagram photo editing tips that will help you create a unique brand aesthetic. while significantly expanding your audience in the process. Read on to discover some handy editing hacks to uplevel your feed.
Edit with filters and presets
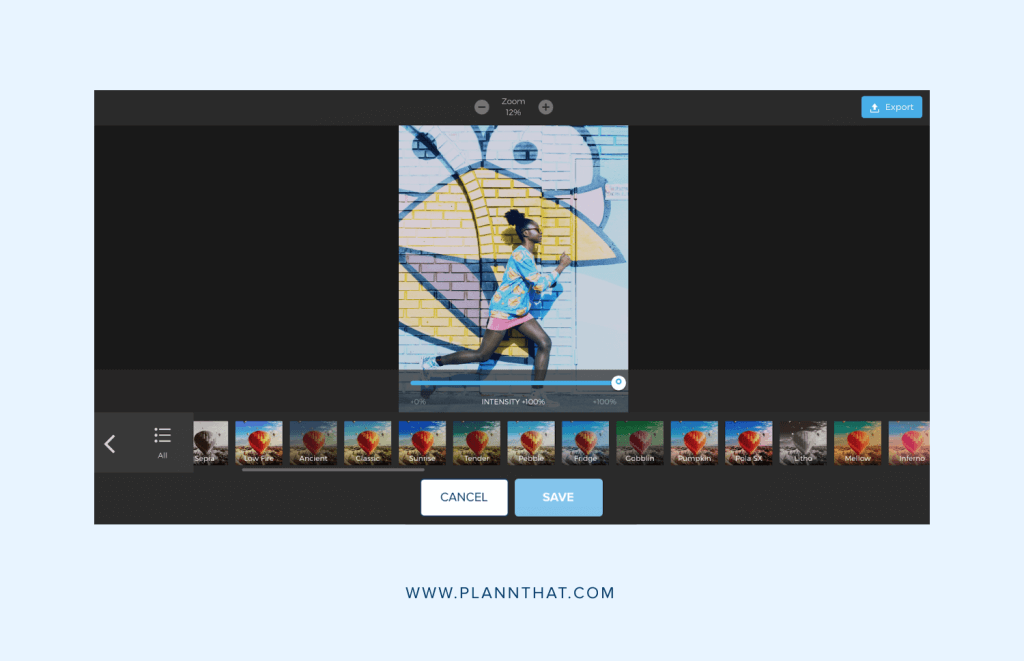
You can improve the look of your images by using built-in Instagram filters or Lightroom presets Obviously, should you get Lightroom for free (or any high quality Lightroom alternative) and employ the software’s presets, your photos will look noticeably more professional, but filters are a nice second choice as well.
A good practice to uphold when applying filters is to avoid setting them at 100% intensity. Instead, play around with different parameters to determine the ideal settings for each filter.
If there are filters you never use, you should hide them or drag them out of sight so that your favorite ones are instantly visible. To change the filter order, pick an image for posting, swipe to the right, and select Manage.
Filters and presets are an irreplaceable tool for creating a cohesive Instagram feed. Consistency is extremely important when you’re still in early stages of growing your brand and audience. Ideally, anyone who sees your image should immediately recognize it as your work or brand — even if your face isn’t visible.
Go to the profiles of your favorite influencers and you’ll see that all of them have a unique look that’s unmistakably them. Presets and filters allow you to create your own signature aesthetic, too.
Mind the composition
A beautiful feed starts with beautiful photos. If an image is out of focus, grainy, or badly composed, all the color correction tricks in the world won’t give you the result you’re after.
Here are some tips to boost your photography skills — even if you’re just shooting on your mobile
• Work in natural lighting . Whenever you can, give preference to natural lighting over artificial light sources. If you’re taking photos outside, the golden hours in the morning and evening are the optimal time for planning your outings.
• Focus on the main subject. Check if the focus is properly set before you start snapping photos. It’s nearly impossible to make a defocused image clearer.
• Rely on the grid provided by your smartphone or camera to compose the shot properly. Adhere to the main composition principles and remember to keep the horizon even
• Purchase an inexpensive tripod for taking photos in poor lighting conditions to prevent camera shake if your device doesn’t include a reliable integrated stabilizer
• Take photos in RAW . If you’re using a photo camera, be sure to set it to RAW format. It stores the most data about an image and will help you achieve fantastic results, while also being better suited for fixing lighting flaws.
Adjust individual photos
If you like to use the Instagram carousel feature that lets you put 10 images into an album, remember that each of those photos can still be retouched individually.
You can finetune these individually inside Plann’s editing tools. But, what happens when you’ve forgotten and have already exported them to your Instagram feed to post? No worries, there’s still time to give them a touch up!
Tap the Venn icon in the bottom right section of the image to bring up editing options that will only be applied to the photo you’re currently working with. Once you’re finished with a single image, tap ‘Done’, and now you can move on to the second picture in the album.
If the album’s photos have different lighting or subjects, then it’s well worth investing the time into editing them one-by-one.
Adjust the Lux settings
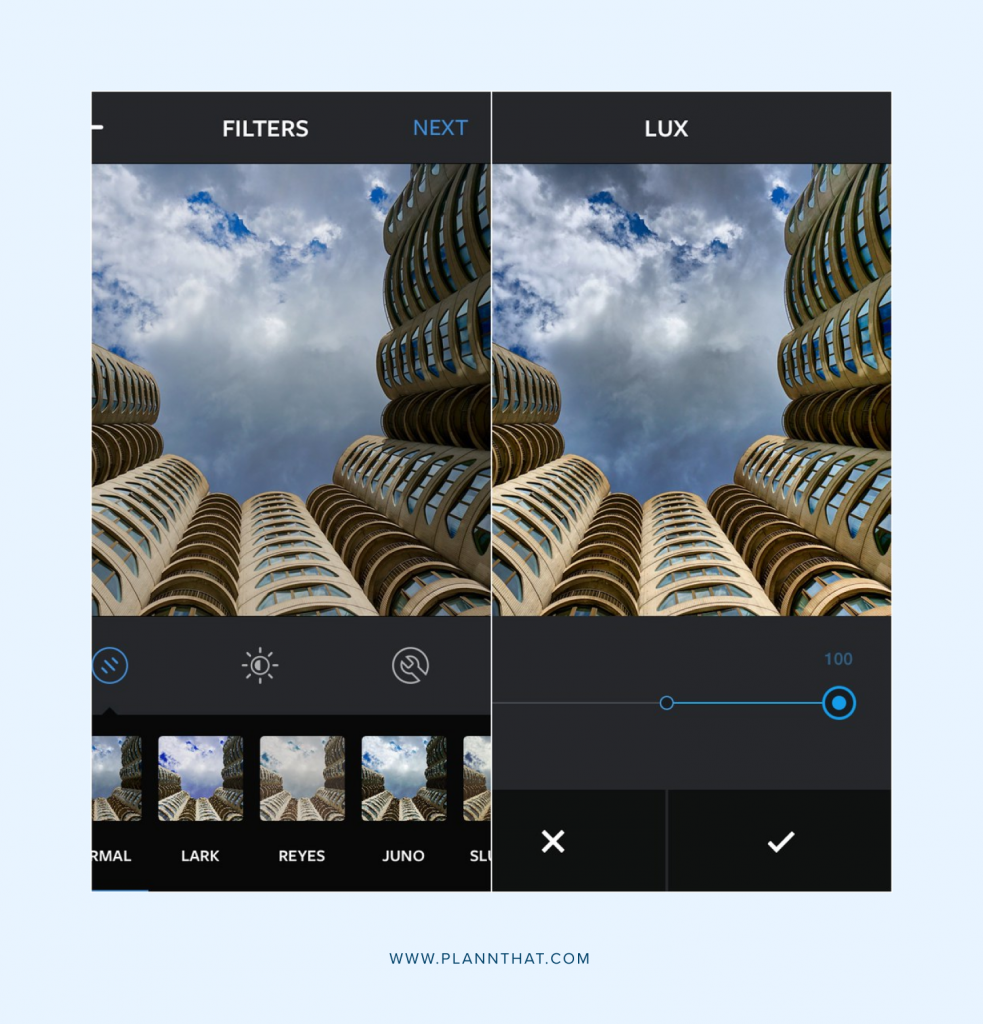
Instagram comes with an enhancement function called Lux, which many users haven’t even heard about. In just a single tap, this feature will add an HDR-like effect to the image, which will make the shadows brighter, dim the highlights, and boost contrast, while making the photo look a lot more eye-catching.
This feature is especially useful for improving underexposed shots or images that lack sharpness. When you’re still browsing through the filter list, tap the sunshine icon at the top, and adjust the slider to reduce or increase the amount of applied lux. Swipe upward to add more or down to add less.
This technique can be invaluable when you need to quickly make a post but don’t have time to edit Instagram photo content properly. All adjustments will be made in a single tap.
When in doubt, crop it out
Cropping is among the simplest techniques for improving the quality of your images. It lets you get rid of distracting elements in a matter of seconds while bringing more focus to the main subject.
When cropping, adhere to standard composition recommendations like the rule of thirds or negative space. The rule of thirds is an Instagram photo editing tip that suggests that each photo is divided into even thirds, both horizontally and vertically, with the ideal subject placement being at the point where the dividing lines cross.
Meanwhile, negative space represents the area around the subject that is left empty. Having a decent amount of negative space can work wonders for captivating the viewer, so try experimenting with having more or less emptiness in the shot for a more impactful result.
Finally, it’s vital to keep the horizon line in the background even! This simple rule will ensure your photos never look amateurish again.
You can do all your cropping, straightening and editing right inside the Plann app, so that it’s post-ready by the time you export.
Focus on minor edits
Beginner photographers tend to get a little overexcited when editing their photos, lacking the understanding that an overabundance of effects, contrast, or light can make the image seem unnatural. Meanwhile, basic image editing is usually enough to drastically improve the quality of a photo.
Basic retouching uses subtle adjustments to the contrast, shadows, color temperature, and highlights. In some cases, you might also want to change the brightness or tone down the saturation of the edges. Regardless of what settings you’ll be adjusting, remember to do it sparingly.
Even basic retouching can be blown out of proportion and negatively affect the photo quality, as the image loses its natural appeal and looks needlessly artificial. Remember to compare the final result with the original image to have a better understanding of what your adjustments have changed.
Desaturate artificial colors to stick to one theme
Oversaturating all tones is a common mistake, and it has a tremendous effect on the final photo (and not in a good way!) One thing you’ll often see bloggers do is instead of boosting the colors by oversaturating them, they desaturate colors that don’t fit the rest of the image to create a coherent color palette. This means you’ll be able to even post photos the colors of which wouldn’t ordinarily fit your Instagram feed!
Pick between 2 to 5 colors that you’d like to highlight in the photo. Having too many vibrant colors might seem overly distracting so desaturating several of them will make it easier to focus the viewer on the subject.
For instance, when taking photos outdoors with a lot of greenery in the background, all the green elements might take away the attention from the subject. Desaturating the greens a bit will help you make the rest of the elements pop more.
Optimize the size
Ever taken a photo on the latest smartphone camera or even a professional camera, but ended up with an image that looks like it was snapped with a flip phone camera from 2007? The problem was likely that you didn’t optimize the size of your content to fit Instagram’s requirements. The app advises against uploading images that are bigger than 1080px in size.
If you upload a photo that has a higher resolution than 1080p, the app will automatically reduce its size to fit the screen. Severe image compression can cause distortion and loss of detail. Similarly, uploading a photo that is smaller than 320×320 pixels can also lead to serious quality issues.
The app will scale up the photo, leading to pixelation and distortion. Thus, it’s vital to ensure your photos aren’t larger than 1080px or smaller than 320px before you upload them to prevent auto-compression. Since Instagram videos and images can vary in size depending on the content and orientation, use the picture above as a reference point.
Save images for later
Not sure if your photo is ready to be posted? Want to come back to it later with fresh eyes? No worries! You can always save it inside Plann (either in your media section or in your grid drafts) and return to edit it more later. It will be there waiting for you when you get back. And, if you get really stuck, there’s always a library of beautiful free stock images you can make use of, and use Plann’s editing tools to keep them consistent with the rest of your grid.